

The other day I was reviewing YAML files of Deployments, and I noticed that the Probes were missing. Since Probes are such a vital part of Kubernetes, I started to add them. But then I noticed I fell into a pattern I had seen in the past, namely, adding livenessProbe and readinessProbe both monitoring the same endpoint, using the same settings.
So I started wondering, is this actually best practice? You do see a lot of Helm charts all applying this way of Probing. But is it correct? Because it sure does feel redundant.
I then grabbed that which should hold the truth, namely the Kubernetes Documentation. Here I found the following statements regarding livenessProbe and readinessProbe:
The kubelet uses liveness probes to know when to restart a container
The kubelet uses readiness probes to know when a container is ready to start accepting traffic
Reading this, I learn that the difference between the two, is that livenessProbe kills the container, whereas readinessProbe will remove it from the service while it’s down.
However, there is a misconception that readinessProbe is only to be used to see when a container is finished starting. Which isn’t entirely so, as the docs also state:
Readiness probes runs on the container during its whole lifecycle.
And in my search through the different Probes, I also noticed a probe I hadn’t seen before, the startupProbe, which was added in 1.16 as an Alpha feature and has graduated to Beta in 1.18.
I thought, let’s test these all and validate them.
And as such, I made a simple Go web server, and fired up Minikube!
The Go web server
For the test I wrote a simple Go web server (find it on Github) which will listen to 4 different endpoints:
- /startupProbe
- /livenessProbe
- /readinessProbe
- /startJob
The first 3 should be self explanatory as what their functions are, and the last I shall explain further up.
What the program does, is simple. It starts a web server and for the Probe endpoints you can set how long it will take before they starts giving off 200 (OK), instead of 503 (Service Unavailable). The times can be set trough environment values, so you can easily test them in Kubernetes.
Then there is the startJob endpoint. This one will trigger the readinessProbe endpoint to give off 503’s for a duration also specified with environment value.
The environment variable names being:
WAIT_STARTUP_TIME (default 30 sec)WAIT_LIVENESS_TIME (default 60 sec)WAIT_READINESS_TIME (default 90 sec)JOB_DURATION_TIME (default 20 sec)
Starting the container should show the following behavior:

Since we have a working Docker container (which you can find here I you want to try it out yourself), so we can start testing!
Testing it on Minikube
For the deployment, I wrote a deployment.yaml file, which will start 2 pods with the same image, and fully configured Probes.
The configuration of the Probes is as follow:
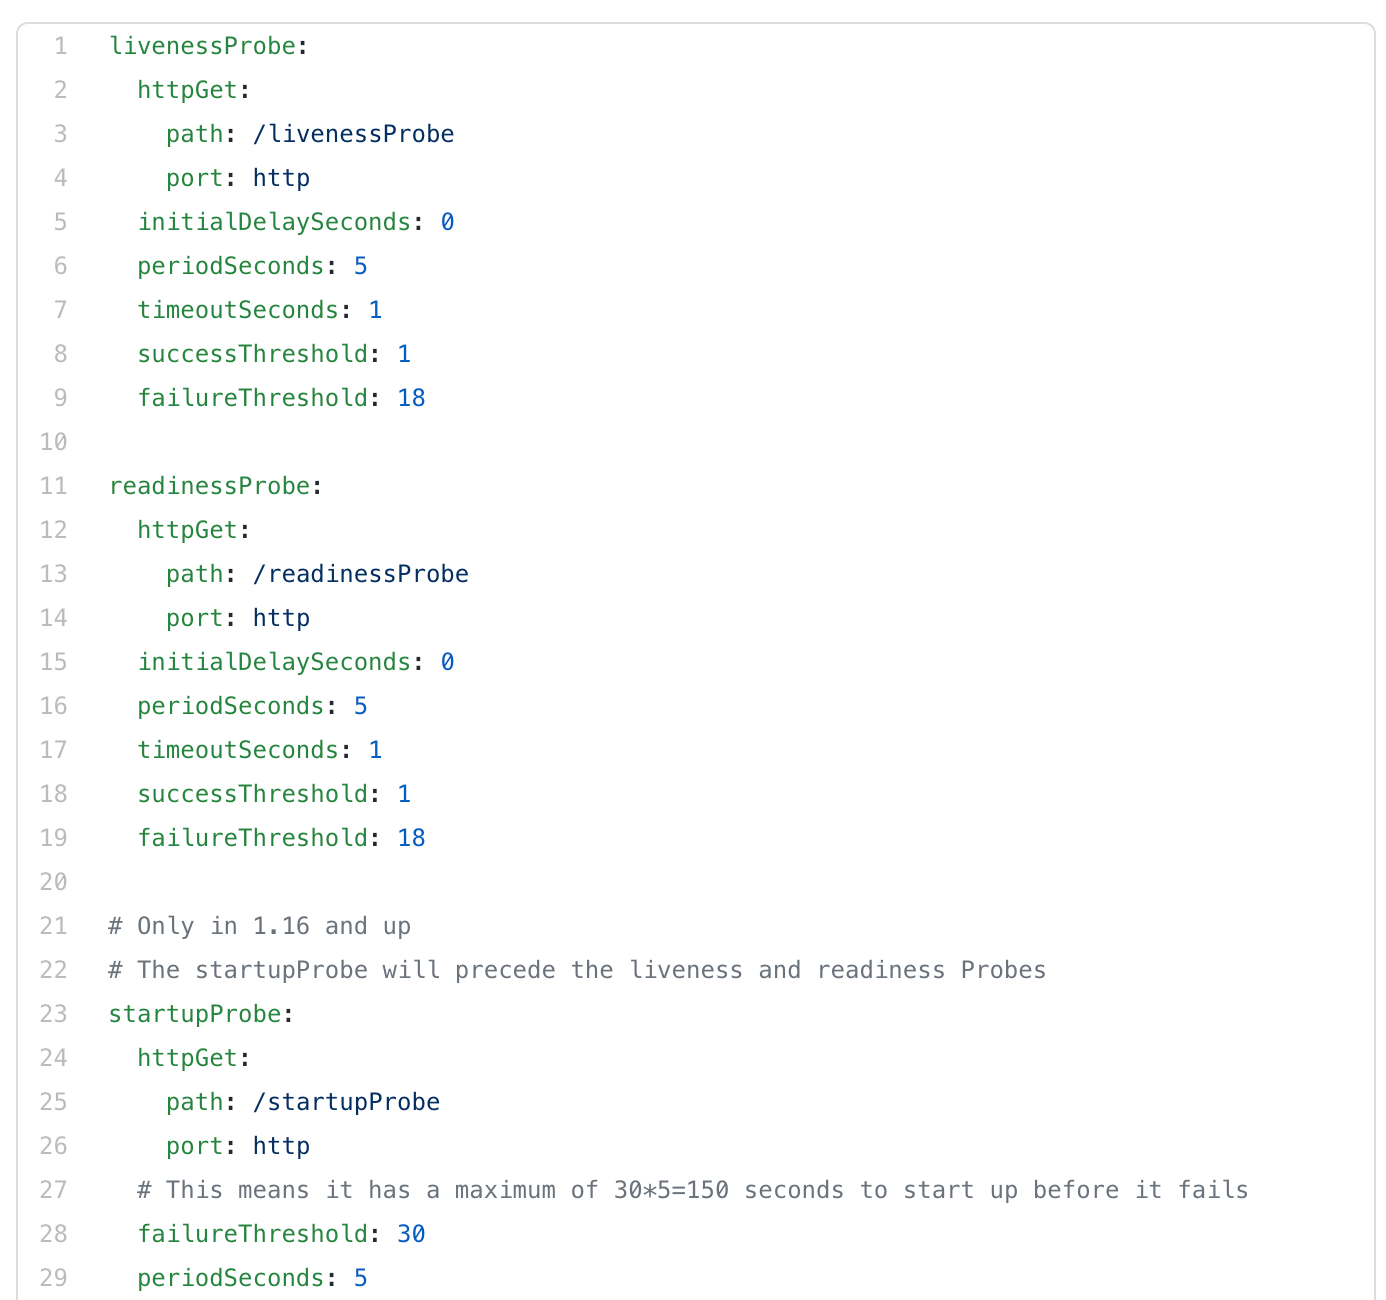
As you can see, I set my initial delay on the livenessProbe to 0, as it will only start counting once the startupProbe has finished. The startupProbe it’s threshold is set to 30 with a period of 5 sec. Which means that it will check if the container is ready for a maximum of 150 sec.
The failureThreshold of the livenessProbe and readinessProbe are set to 18 so that both can take 18*5=90sec before they fail, which should be ample time to come up based on the default values shown above. With the given values livenessProbe should come up before the readinessProbe .
Don’t use this in actual setups though, as this will also affect the duration before Kubernetes will act if your pod misbehaves. These values are to test the startup behavior.
To run this test yourself, you can download the deployment.yaml and apply it on your minikube. Do note, you need Kubernetes version 1.18 in order to use the startupProbe (use the flag — kubernetes-version=1.18 when starting minikube).
Applying can be done using kubectl apply -f Kubernetes/Deployment.yaml
Liveness before Readiness
After applying it on minikube and watching the pods being created, I saw they are behaving in the manner I expected them, with the values I’ve set (I left the default values).
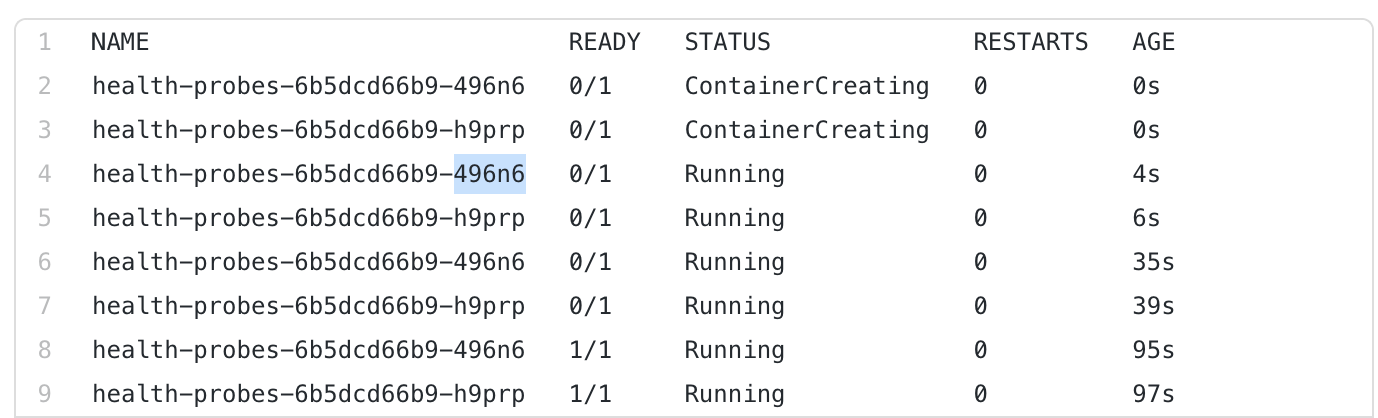
Running the test, I notice it takes around 4~6 seconds to create a pod, followed up by a state change around 30 secs. This corresponds to the startupProbe time. Then it takes a total 60 seconds before I see the Pods as Ready.
So I can already conclude that, if I have all Probes, readiness is the final Probe to determine the status of the Pod. This is exactly as expected. What happens if readinessProbe isn’t stated?
No Readiness Probe at startup
So I comment out the readinessProbe and fire it off again.

Here I can clearly see that the startupProbe and livenessProbe, even though defined, have absolutely no effect on the status of the Pod. This is clearly unwanted behavior, because the Pod is now marked as Healthy when it’s not, and that can result in a short downtime.
A simple example is when you update the image of the pod to a new one. It will create a Pod parallel with the new image, once it’s created and marked as Ready, Kubernetes will then kill off the old Pod. But the new one isn’t really ready yet, Kubernetes just thinks it is. Thus, it’s best to always have a readinessProbe defined.
ReadinessProbe while running
Then I can test the readinessProbe on an already running pod. To do so, I will port-forward to the pod using kubectl port-forward deploy/health-probes 8080:8080
If I simultaneously run kubectl get pods -w, I can watch the status of the pods in the meanwhile.
Then I go to http://localhost:8080/startJob and see the following message:
health-probes-64c858bf4b-ph6m2   1/1     Running   0          12m
health-probes-64c858bf4b-shfpr   1/1     Running   0          12m
health-probes-64c858bf4b-ph6m2   0/1     Running   0          14m
health-probes-64c858bf4b-ph6m2   1/1     Running   0          14m
Now that the ‘job’ is started on the container, the readinessProbe should start signalling 503. And as expected, the ready state goes down of this particular pod, and comes up again 20 seconds later.
Warning Unhealthy 2m3s (x4 over 2m18s) kubelet, minikube Readiness probe failed: HTTP probe failed with statuscode: 503
To confirm it was indeed the readinessProbe that triggered this state change, I inspect the pod using kubectl describe pod health-probes-64c858bf4b-ph6m2
The following line confirms it was indeed the readinessProbe that failed and caused the status to change.
Conclusion
I played around with the different Probes and it should be more clear as to what their individual purposes are.
StartupProbe
I really like the new startupProbe. As in the past (or rather, the present), we only had the initialDelaySeconds to work with. This, however, is a static number. So if you had a pod that occasionally needs to do DB migrations, you always need to set it to the worst-case scenario to prevent unwanted reboots due to the livenessProbe kicking in. Which also delays startup when it doesn’t have migrations to do!
Now you can set the worst-case scenario time, and still have a pod coming online quickly when it doesn’t have any migrations to do.
The only downside is that it’s in beta since 1.18. So it will still take a while before we can start using this on KaaS platforms such as EKS, GKE and AKS as these are still all on 1.15 at the moment of this writing.
LivenessProbe vs ReadinessProbe
Then, going back to the initial question, is it best practice to have identical readiness and livenessProbes ? It depends.
As we learned, the livenessProbe will always restart the container when it fails, so there isn’t a container to take out of traffic for the readinessProbe to act upon when it’s already getting killed. However, we do need a readinessProbe to be able to have an accurate Ready status.
Does that mean we only use readinessProbe to signal a ready Pod on startup ? Well no, as I already showed you, you can use the readinessProbe to take the pod out of Traffic for a short duration.
What can you use it for then, other than startup?
You can use the readinessProbe to indicate your container can’t do the job it needs to do. Say, you lose connection to your database. Let the container pull down the readinessProbe while it attempts to reconnect. If it fails, pull down the livenessProbe, or set the livenessProbe to a higher threshold, accounting for the time it takes to reconnect.
Another option is, is to use the readinessProbe to divide work along with your pods. If the container is busy with a job, set it’s readiness to false, so other pods will receive work. Once it’s done with the job, set readiness to true again.
Also note, that having a readinessProbe while you’re only running 1 Pod is only useful for the startup. If you’re removing a running Pod from traffic, there will be no other pods who will be able to do the same workload. So you’ve effectively shut down your service. Just keep it identical to your livenessProbe then.
In short. Your readinessProbe has more uses then you’d think, but only if your application supports it. And always set your readiness and livenessProbes if you can, as it will improve your uptime.
Finally, when you eventually get to version 1.18 of Kubernetes, be sure to use that startupProbe, as it will only make things easier and more accurate.
Find out more about our Kubernetes services here.